
A LINE IS DRAWN
William Chinn, Jr.
For some, it is difficult to get the right look for their salmon flies. The accompanying diagrams may help in improving the look of one's flies.
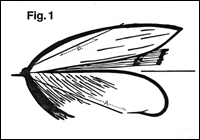
In Figure 1. a hook was xeroxed and enlarged. Then a line (A) was drawn from the end of the hook to its barbed point. Now duplicate this line above the shank of the hook (B) using the same angle and length as the lower line (A). These are the two most important real or imaginary lines you'll ever be associated with as a tyer (may as well be bold in that statement).
The bottom line (A) gives you a reference point for the line or angle of any body and throat hackle for the fly. The closer the hackle parallels this line the sleeker the look of the fly.
The angle of the hackle shown in the sketch (Fig. 1) is about right for this fly's profile. The heavy black line at the throat is shown to illustrate that if the throat hackle were to enter this area the hackle angle becomes too steep and hurts the fly's profile.
The top line (B) in Fig. 1 where it ends (approx. above the hook point) is a good reference point to visualize the maximum height of the fly's wing. If the wing's height exceeds this reference point too much, the look of the fly will start to be top heavy.

The hackle is slightly long but you can get away with it because it nicely follows line A.
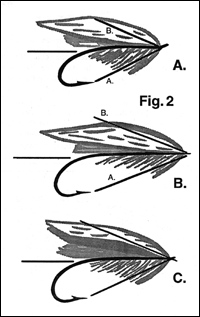
Drawing B is of a long shank blind-eye hook. The wing's height is below the maximum height allowed by line B. This lower profile creates a sleeker (graceful) look and also allows more leeway in the placement of the crest as a topping.
The hackle is drawn in a little short but again it isn't a distraction as it correctly follows line A.
Drawing C is a regular shank blind-eye hook. The hackle seems to have the right angle and length. Wing height is also about right. This drawing differs from the others because of the wing – it angles upward. This style in which the wing angles up bears more attention and could prove to be a beautiful exception to what is discussed here.
The question of wing length is not discussed here; however, it is sufficient to say that the wing can be as long as you want, all things being equal.
Hope this helps in creating a nicer looking fly. A fly's profile and style are too often overlooked. Emphasis on technique is fine to begin with but what good is a smooth floss body when the fly is still ugly as Sin?!
People can teach technique – can I say the same for style? Whatever the answer, a fly's style or profile comes down to the individual tyer and his or her individual tastes.
Next time, while tying a salmon fly, concentrate on its profile and style and forget about the uneven ribs or lump in the floss. You may find your flies dramatically improving in beauty.
Just a wild thought – salmon fly tying really isn't much harder than any other type of fly tying. It only seems to be difficult because everybody's telling you so. Why? Self-aggrandizement perhaps - Naaah! But, Pssst! Hey! The secret's out - it Ain't!
