
THE WING
by Tom Juracek
This article was written as the result of a telephone call I had several nights ago from a fellow reader of this publication. To all the readers who may have discarded materials as being worthless, my apologies for being delinquent in writing the following. To those readers for whom I am about to turn worthless or unusable materials into good materials, you owe me a debt of gratitude that I intend to collect!!
On a more serious note, swan feathers, while called for in tying almost all wings on salmon flies do not necessarily lend themselves to being the most workable material. The tyer commonly uses the secondary wing quills ("secondary remiges" for you technical types). Occasionally one finds also the feathers that fit between the wing and the body. Sorry Wayne, didn't know the technical terms although perhaps they are the upper major secondary coverts (UMSC)?! At any rate, the UMSC tend to resemble what are commonly referred to as center feathers. These feathers generally display a good curvature and contain more than adequate barb length for winging salmon flies. What I dislike about them is that they tend to be "thin" in the barb diamter. They are rather translucent with a lot of barbules but not much substance. They also tend to taper to a very fine tip for about the last quarter to half inch. When tied on as a wing, they tend to make the fly look weak and underwinged.
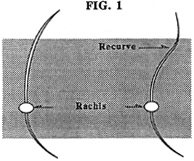
The secondary feathers are the ones I prefer to work with. There is a little more substance to the barb, but a dramatic taper still exists in the last quarter inch. A major problem can arise from these feathers, i.e. recurve. This is where a feather starts to curve back towards its center and then near their tips the barbs curve back out and away from the quill. (Fig. 1).
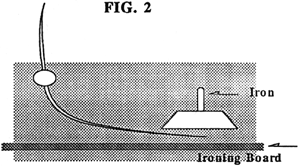
How to fix the recurve? This is my currently approved method (Fig. 2). I have a steam iron which contains six settings. I select setting number two, which does not produce steam. Holding the feather up above a smooth surface, I proceed to form the desired curvature (actually much more than intended in the final product) by lowering and sliding the feather along the surface. I then iron the feather. The iron touches only the barbs and goes no more than halfway up the barbs to the rachis. DO NOT apply too much pressure. The heat will do the work. When done properly this will produce a dramatic curve in the feather in the proper direction.
This may or may not be a permanent fix. Some feathers will respond to this treatment and hold their shape. Others will, after several hours of sitting or upon handling, return to their original shape. For these feathers a second step is employed. Take a piece of cardboard of the type commonly used for making boxes. Carefully slice in one side a small trough that is roughly the size and length of the rachis of the swan feather. Don't forget the curve. Make enough slices so that you can fill the piece of cardboard with feathers, but do not allow any two to overlap. You will now need a matching piece of cardboard without slices. Iron the feathers as described above and lay them into a slice, good side up. After filling up the piece of cardboard, cover with the unsliced cardboard and place a heavy object on top of this sandwich. I use the speakers of a stereo system. Allow a month to pass before expecting to use these feathers. I would recommend at least 8 weeks. Remember that the feathers are not any good now so no sense in hurrying the reclamation project.
Now for the do's and don'ts of the above method. Do NOT attempt this method with any feather from a land-based bird. ONLY attempt it on waterfowl. Why? Due to the structure of waterfowl feathers, the barbs do not have a tendency to turn under the ironing process. Iron a Golden Pheasant tail and the barbs will turn 90 degrees on you. The quantity and meshing of the barbs in waterfowl feathers tends to inhibit this problem.
A tip for dyeing swan. Never attempt to dye a swan feather that has not been immersed in water for at least one and a half hours. Make sure you have thoroughly washed the feather, probably twice, before dyeing. If the feather is very wet and "full" of water it will absorb the dye much easier. Just as the feather naturally repels water, so it will repel dye unless properly soaked.


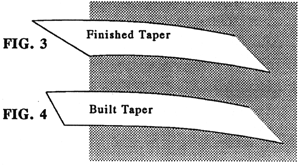
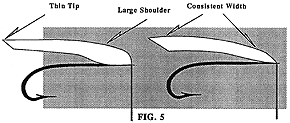
After lashing the wing to the hook, I gently stroke the upper fibers towards the rear of the hook. Also, I pull the lower fibers up onto the top of the hook. Proper stroking will narrow the shoulder section of the wing, place a more gradual taper into the end of the wing and allow the it to assume the desired shape (Fig. 5). I am literally remarrying the wing after it is applied to the hook. If you wish to see an example of what happens to the wing when it is tied down, take a section of swan 5 strands broad. You will be able to see the difference in the width of the strands at the base and at the tips as you hold it. If you stroke the wing in a manner to elongate the taper at the tip, you will find that the overall width of the section becomes much more consistent. If you attempt to shorten the taper, the difference in width becomes larger (Fig. 5). Further, you will notice that the fibers do not tend to remarry when shortening the taper. Rather, the tips remarry and towards the butts the barbs separate from one another while remaining married in their original positions. The barbules refuse to release and remarry and as a result the tension is relieved by separating from one another while remaining married.


Sort your feathers. If you have swan sections that do not have recurve, use these on flies that require swan sections and not much else. Use the recurve feathers in flies that have numerous and differing wing materials. Don't be afraid to use dyed turkey as one of the wing sections and make the remainder out of swan in order to help alleviate the recurve. Turkey is a tough, durable, thick-barbed feather that will straighten out just about any excessive curve or recurve.
Golden Pheasant feathers sometimes have incorrect curves. My experience in this area says that the feathers tend to "cup" to an excessive degree. As the barb leaves the rachis it is at a 90 degree angle to the rachis. As you follow individual barbs out towards their tips, the barbs curve back towards the rachis on the inside (good) but also can tend to turn with the inside (bad) side of the barb facing the tip of the feather. This twisting action can make the Golden Pheasant hard to marry to other feathers, hard to marry to itself and difficult to maintain proper shape when pressure is brought to bear while lashing the wing to the body.
My solution to this is as follows: Remove from the tail the fibers from the side you do not intend to use. Place two pieces of cardboard together. Gently place the pheasant tail barbs between the two pieces of cardboard but leave the quill outside along the edge. Grab hold of the pheasant tail rachis near the butt of the section and gently push towards the tip of the tail. This should cause the barbs that are between the two cardboard sections to roll towards the butt of the feather. Tape the two sections together, allowing the tape to hold the rachis of the tail against the edge of the cardboard. Again, place under a weight. The feathers should have assumed a workable shape in only 2 to 3 days. This fix should be permanent.
A lot of other tyers have contributed to what has been written here, sometimes through direct ideas, sometimes through thought provoking suggestions. I would like to take this opportunity to thank all who have contributed, knowingly and unknowingly to this article.