Marvin Nolte
Sorry, alliteration at any avenue is an abomination. Both of these implements were designed by John Betts and were originally used to crimp synthetic fibers on trout flies. I use mine in a similar fashion, but to reshape feathers by crimping their rachides instead. The following procedure for making this rachis crimper is taken (with permission) from Synthetic Flies, 1980, by John Betts.
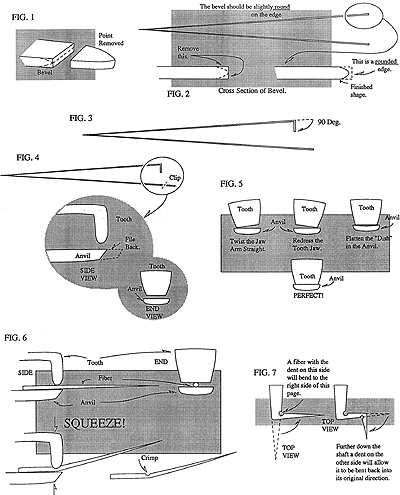
"1. Get the cheapest tweezers you can that are comfortable to use (Revlon square tipped eyebrow or X-Acto 4 1/2" - 5" pointed tip. I use the latter and like them better, but then I'm used to them). On the pointed tipped pair, the points must be removed (Fig. 1) and the ends made square. The square end should be about 3/16" across. Bevel one jaw to the shape shown. Check with a magnifying glass. I use a small (7") milling file to do this (Fig. 2).
"2. Bend about 1/8" of the beveled jaw down at a right angle (Fig. 3). Do this slowly. The steel is mild but not strong and may snap - for this reason two sets of tweezers are a sensible purchase. The plated finish of the steel will also crack and flake off - don't worry about it. This right angle bend forms the "tooth".
"3. Squeeze the tweezers together and clip the underjaw back to the outside of the tooth. Then with a file bevel the underjaw - the "anvil" - back until the upper edge is just beyond flush with the outside of the tooth (Fig. 4). Using very fine (400 grit) emery, put it between the tooth and anvil and pull it through them. Do this 3 or 4 times with the grit on the tooth side and then 3 or 4 times with the grit on the anvil side. Don't squeeze the jaws together too hard or the tooth will tear the paper. However, apply enough pressure to cause abrasion. The edge on the tooth will flatten a little, restore it to its rounded bevel. The emery "wears" the jaws together.
"4. With a buffing wheel and polishing compound polish the tooth and the anvil. Both must be smooth and free from sharp burrs or corners on their pressure surfaces.
"Check this with a magnifying glass. Also check to see that the anvil meets the tooth over most of its beveled edge (Fig. 5). If it doesn't - it must. The correction of a "miss" may be accomplished by simply twisting one of the tweezer jaws or worse redressing the tooth to fit. In the anvil jaw, the inside surface may be slightly dished. This is due to stamping. Sometimes you can get away with pounding it out (flat), at other times it may have to be filed flat. Take your time making them. They'll last indefinitely and are very useful for all sorts of things.
"5. Put a fiber between the tooth and the anvil so that the tooth will come down at a right angle to the fiber shaft. Squeeze - the fiber is now crimped (Fig. 6). What happens is that the tooth puts a dent in one side of the fiber shaft. The fiber will always bend to the side the dent or crimp is on and at right angles to the dent (Fig 7)."
I know, I know. You perform the same crimping action with a well aimed fingernail pressed against the feather and the pad of your thumb. It works, and fingernails are: free, hard to lose and always convenient. Very well, try this with your fancy freeloading fingernail - crip the feather after it has been tied in.
You may wish to modify the basic rachis crimper by cushioning the anvil. John finds that the rachis is less likely to roll out of position if the anvil is covered with a resilient material. I was cutting a lot of feathers in half so needed something to soften my heavy handedness. John prefers vinyl tubing, I use heat-shrink tubing.
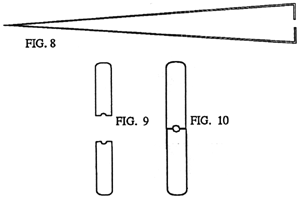
Check the tying tips column in the Winter, 1989 issue of Fly Tyer Magazine (now American Angler and a shadow of its former self). You will find instructions for making a hair packer out of a pair of tweezers. Actually, when I submitted the article I used the (perfectly legitimate) term forceps. This lead to much confusion on the part of the editor who confused forceps with hemostats, thus confusing the readership. I even sent drawings, as editors are easily confused (except of course you, Mike) (You don't know me very well, Marv! - Ed.). All of this confusion was corrected when the same tool appeared in Fly-Tying Tips (1990, Dick Stewart). If you cannot find the magazine or the book, find another pair of forceps, pardon me, tweezers, and modify them as follows: bend both squared off tips toward each other at right angle (figure 8). File a notch in both tips (figure 9). The notches in my model form a hole of about one sixteenth inch when the tips are pressed together (figure 10). Dress and smooth the tips and notches.
If all that is more bother than it is worth you have another option. Christopher Helm markets an identical item, used for packing deer hair, called a Brassie (which is the same name as an old Scottish golf club! - Ed.) Many fly shops and catalogs carry them.
Since few salmon flies, particularly Victorian classics, call for packed deer hair, where is this leading? Toward something truly esoteric, natch. This tool only looks like a hair packer. Actually it is a gut crimper. I like to form twisted gut eyes around a bobbin tube but use whatever suits you. Bend the gut around the tube then pinch the legs of the gut tightly together in the hole formed by the notches in your crimper. Squeeze firmly, pull the bobbin out, and you have a perfect loop. I take the process one step further. Still holding the gut loop in the crimper, wrap a few turns of thread and a whip finish around the neck of the loop. Stored this way the loops take a set and behave better when tied in.
You may have notice that I seem to have an obsession for crimpers. First it was Indian Crow Crimpers, now its Rachis Crimpers and Gut Crimpers. I still have my blasting cap crimpers from my days in the bomb squad. Has to be a tying tool in there somewhere.