

|
HOOK MODIFICATION
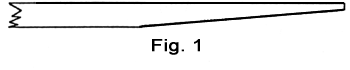
Charles Judy I have become involved in trying to make classic blind eye hooks from readily available eyed hooks. I wanted to do more than just straighten the eye - I wanted to duplicate the styles of the past. I didn't want to have much invested in my raw materials so I decided to use Mustad 36890 hooks of which I paid eight dollars for a hundred in size 4/0. I didn't have to concern myself with the cost of wasted hooks as I experimented. REMOVING THE EYE Use an alcohol lamp to straighten the eye. The lamp has a much smaller flame than a propane torch and provides enough of the necessary heat to do the job. Heat the eye until it glows red and bend it a little. Heat to red again: and bend a little more. It is easy to break the during this step unless you take it slowly. I've found that just gripping a Mustad 36890 2/0 with pliers can cool it enough to cause it to break when it is bent unless I am very careful. The smaller the wire, the more care is needed. When straightened it will look something like this from the top: |
 |
|
You will find that there will be small curves in it as well During manufacturing, one side of the hook is kept flat and some material on the other side is removed when the eye is formed. This makes it rather difficult to grind the eye area to a taper for our blind eye. Use a very small (1/4 pound) machinist's hammer and a piece of polished steel for an anvil to hammer out the curves and modify the eye area so that it is more like this: |
 |
|
Wait until the hook has been bent to shape before grinding the eye taper. ANNEALING Annealing the hook softens it an allows it to be reshaped without as much danger of breaking. Use a propane torch for this step. Holding the hook by the eye tip of the shank with an old pair of pliers, heat the hook quickly to red or just above the "critical temperature" and allow it to cool slowly (while still holding it by the eye). Structural changes take place in the piece of steel at the critical temperature and the manner in which it is cooled will determine whether it will be soft or brittle. There is a simple check to determine hen the critical temperature has been reached or high carbon steel hooks such as these. As the hook is heated, remove it from the flame and quickly check the heated part of the hook with a small magnet. If that part is no longer magnetic, the hook has been heated above the critical temperature and no additional heating is necessary. Prolonged heating at this temperature or heating significantly above it may result in a poorer quality steel. By using an attachment for the torch that producers a wide, flat flame, the entire hook can be heated uniformly, minimizing the time it is in the flame. The hook will now be relatively soft and can be formed without breaking. |
 |
 |
|
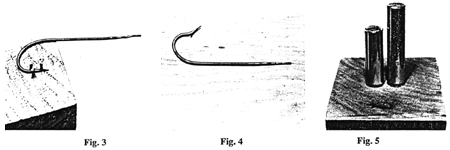
The next step is bending the hook to shape. I have collected as many pictures of traditional hooks as possible to use as guides in shaping. Making a bending form from wood of the desired hook shape did not work well so I made several simple bending jigs and bent the hooks freehand. The jig in Fig. 3 is used to bend the point to the shape shown in Fig. 4. To shape the point, just grasp the hook wire directly behind the barb with a pair of needle nose pliers and bend. Reshape the barb as desired with the pliers. To obtain the desired overall hook shape lay it over a picture of the hook you are trying to duplicate and see how it needs to be bent, then place it between the bolts of the jig shown in Fig. 5 and bend slightly. Compare the hook with the picture and bend again. It will take a number of iterations of this bending operation but any number of traditional hook shapes can thus be obtained. With some practice a hook can be shaped in just a few minutes. The jig shown in Fig. 3 was made by laying a hook on the end grain of a piece of oak and driving three steel brads in as shown. The jig in Fig. 5 was made using two 3/8 inch bolts about 3 inches long with about 1 inch of the length threaded into the end grain of a piece of hardwood about 20 inches wide and 4 inches long. Drill two holes 1/64 inch undersize for the bolts spaced so that there is just enough room for the hook wire to pass between the unthreaded portion of the bolts. My bolts are about 1/16 inch apart and this seems to work fine for hook sizes 2/0 through 4/0. I have made another jig using smaller bolts with closer spacing for finer wired hooks. GRINDING THE EYE The operations that are likely to break the hook are now complete and you are ready to shape the hook shank for the blind eye. Clamp the hook in a small hand-held vise with jaws that have been lined with leather and grind the hook using a Foredom variable speed tool. The first pass is along the top of the shank removing just the irregularities to give a straight and even surface. Then grind a taper on the bottom and sides. After the taper has been formed, switch to small files and remove the ridges to give a rounded and smooth taper to the shank. The tapering could be done with files only but the Foredom tool speeds up the process. HARDENING AND TEMPERING The hook can now be hardened by heating it to the critical temperature and rapidly cooling it. Then it is tempered by heating to a temperature below the critical temperature. The hardened hook will be quite brittle and lack toughness. Tempering will remove the strains in the hook and give a balance between hardness and roughness. The temperature for tempering and the time at that temperature will determine the balance in the finished hook. To harden the hook, grasp the tip of the eye with pliers and heat it while carefully checking with a magnet for the proper temperature. Do this heating in a semi-darkened room so you can see that the hook is of a uniform color, meaning a uniform temperature. The hook will now be brittle and easily broken. Temper the hook in a kitchen oven at 410 degrees F. for one hour. Put the hook on a piece of aluminum about 10" by 6" by 1/4" that has been heated for 30 minutes to let it stabilize at that temperature. After heating for the hour, remove the hook and dump it off the aluminum and allow it to cool. Do not leave it on the aluminum during cooling. It is not necessary to quench it in water at this time but you may do so if desired. It doesn't matter how the hook is cooled after tempering by this heating method. CLEANING The hook will now be covered with a light scale and will need to be cleaned. I use phosphoric acid, available from paint stores as "Concrete Etch and Cleaner". Put some of the acid in a small jar with the hook and place the jar, uncovered, in a pan of water that has been heated to 150 degrees F. Be careful to keep the jar upright. In about 30 minutes the hook will be free of the grey scale and should then be washed and dried. The hook should now appear a dull, dark grey to black and it will be lightly pitted. FINISHING This is the process that has proven to be the most difficult. I have tried unsuccessfully to achieve a finish that is as hard as the original using various paints either brushed or sprayed on. I have temporarily settled on an auto touch-up spray paint called DUPLI-COLOR. I use their black primer, DS 98 and black paint, DS 100. One of the reasons that I like this paint is because the amount that is released when spraying is small and I feel that I have better control on coat thickness. The detail of the point and barb can be lost with a little excess paint. Support the hook vertically by the tip of the shank and spray on a coat of primer. Allow this to dry and then spray a light coat of paint which should be allowed to dry at least a day. There will most likely be irregularities in the surface that can be removed by a light rubbing with 00000 steel wool. Spray again and allow to dry for two more days. Go over the hook for a final time with the steel wool. Be careful, a little excess pressure by the steel wool will cut through the fairly thin finish thus requiring another coat. The hook will now have a flat black finish and will probably have bits of steel wool clinging to it. Baking the finished hook will aid in hardening the paint. Heat the oven to 200 degrees F. and put in means of supporting the hooks. I have small holes drilled part way into the plate of aluminum that I use for tempering allowing the hook to be placed vertically. Next wash the hook under tap water to remove the bits of steel wool and, without bothering to dry it, put it in a hole in the plate. Bake it for 30 minutes. This will produce a nice, glossy black finish. FINAL COMMENTS There are a number of hooks that are good prospects for modification such as a Mustad 94720. The Hook Book by Dick Stewart is practically a necessity for choosing candidates. The Partridge CS-15 provides a lot of steel but I haven't been satisfied with the point and barb and haven't yet figured out how to cut a new barb. All of the tools required to do the modifications cost less that $50 Thus making this an inexpensive way to produce good, classic salmon fly hooks. Many tiers using custom hooks place a small piece of card stock in the vise to protect the hook finish from marring. In addition, I use a small rectangular piece of sheet mylar inside the card stock because I have noticed that some finishes can be dulled by direct contact with card under pressure. I would like to hear from anyone who has questions about this article or suggestions that might be of help. |