
|
SPEYS, DEES & MORE, OH MY! PART II
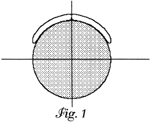
Dave Paris When we last left our superheros, (whoops, wrong story.) So, you've come to finish what we started last time and hear another opinion about how to mount Spey and Dee wings. How very kind of you! This may clear up the headache for some of you and for others, it could get you on the road to new and exciting adventures. If we look to history for the lessons, we find both Kelson and Pryce-Tannatt very helpful. Kelson offers superb techniques for winging Dee flies (although his Spey wings are more adapted to fishing, not exhibition dress) and Pryce-Tannatt is helpful in both departments. Let's look into each wing type separately. Spey wings; nothing lies as low, caps a body or makes a fly look as sleek as a well applied, exhibition style, Bronze Mallard wing. By exhibition style, I am referring to the very low, nothing showing on top of the shank, any lower and the wing is under the fly kind of look. Traditionally, according to Kelson, the Spey wing was actually reverse tied and sat rather vertical to give more play in the current. This does nothing for my sense of style. Now, Bob Veverka, Syd Glasso or Steve Gobin, these guys, to me, have more panache than any ten -mortals put together should have. The secret to wings this low lies in two places. The first is the tie in point on Bronze Mallard and the second is just how much of the shank these take up. Bronze Mallard, when used properly, can virtually mount itself onto a hook When used improperly, it can increase your more colorful vocabulary multi-fold. As you look at the Bronze Mallard flank feather, you'll notice that each fiber has many more barbules (fluff) in the gray base area and that the closer you get to the quill the denser this becomes. This is the magic tie-in zone. Ideally, you'll strip the fibers off the quill (never, ever, cut the fibers or you'll put your knee out of joint kicking yourself in the tush for doing this) to retain the thin, continuous filament strip at the base of the fibers. This strip keeps the fibers together during the tying process. The object of the game is to select a feather which has just enough length in the fiber to allow you something less than 1/8" of fluff to the eye side of the tie-in point. If you've properly selected your feather and you pay attention to the next point; when next you try tying a Spey, you should be quite amazed. Bronze Mallard doesn't like to be squashed and mangled, so part of the trick lies in spreading it out around the shank. Look at Figure 1 and you'll see what I mean. This wrapping effect automatically gives you the sleek appearance and covers the top of the throat hackle. |
|
 |
 |
| The second topic of our little chat today tackles that ever-troublesome matter of mounting Dee wings. Ali yes, slim, sleek, simple strips of Turkey and other large fibered birds which are either partially or wholly responsible for the development of Rogaine. Actually, I think only partially responsible, since Topping Wings must also be a guilty party, but that's a topic for another article (nudge, nudge).
Similar to Bronze Mallard, all attention must be paid to the tiein point, placement and covering of the shank and material selection. First, select a feather which has fibers less than 1/4" longer than you'll need and split. the quill in half. Do not (for fear of your knees again) cut the fibers from the quill. Select a slip of fibers just a hair narrower than you think would look really nice and cut this slip out of the quill. Now, shave the quill until just the littlest bit is holding these fibers together. Kelson recommended this highly, I believe it reduces the stress between fibers when you're tying the slip in. Once you've gotten this far, go fix yourself a nice relaxing beverage (personally, Bombay Sapphire over ice, two almond stuffed olives marinated in extra dry vermouth, thank you very much). Now, before you go tying this whole mess onto the iron, let's examine the where and why of the whole thing. First, look at Figure 2. The strips are just as on top of the hook as they can get. This allows for fiber compression (think of it as a married wing set flat and you really want this thing to lay in the same plane as the shank) and flatness of the strip. The trick to setting these strips so high on the shank lies in the techniques of Kelson. For the far wing (right handed, that is), you want a strip from the left side of the quill and prepare as described above. Then using the thumb and forefinger of the right hand, nick the tie in point using the pad of your thumb and the nail of your finger. This will pre-compress the strip in the desired lateral direction. Use your left hand to then do the near strip. Then, after taking a couple of close wraps, use the bit of quill still attached and steer the strip into its proper place. See your handy copy of Pryce-Tannatt for the correct 'VI orientation between the two strips. One final note, you may find it necessary to reverse the thread to do one of the strips. Well, we all have our little frogs to kiss, maybe yours will be a shining prince! |
|
| Note: The winter and spring issues were the only issues published in Volume 7. |